Overview of Stitch and Glue Boat Painting Tips
Stitch and glue boats are a popular choice for boat enthusiasts due to their simplicity and versatility. These boats are constructed by stitching together plywood panels and then gluing them with epoxy resin. The process is relatively straightforward, making it accessible to both experienced boat builders and beginners alike. The result is a lightweight, durable, and cost-effective boat that can be used for various purposes such as fishing, recreational boating, or even as a tender for larger vessels.
One of the main advantages of building a stitch and glue boat is the ease of construction. Unlike traditional boatbuilding methods that require complex joinery and specialized tools, stitch and glue boats can be built using basic woodworking skills and commonly available materials. This makes it an attractive option for those who want to build their own boat without investing a significant amount of time or money.
Key Takeaways
- Painting your stitch and glue boat is important for both aesthetics and protection.
- Choose the right paint for your boat based on its intended use and the environment it will be in.
- Properly preparing your boat for painting is crucial for achieving a smooth and long-lasting finish.
- Applying primer and paint requires attention to detail and patience to avoid drips and uneven coverage.
- Regular maintenance of your painted stitch and glue boat will help extend its lifespan and keep it looking great.

Importance of Painting Your Stitch and Glue Boat
Painting your stitch and glue boat is not only about aesthetics but also plays a crucial role in protecting the boat from water damage and UV rays. The plywood used in the construction of these boats is susceptible to rotting if exposed to moisture for extended periods. By applying a layer of paint, you create a barrier that prevents water from seeping into the wood, thus prolonging the lifespan of your boat.
Additionally, UV rays from the sun can cause the plywood to degrade over time. Painting your boat with a high-quality marine-grade paint provides an extra layer of protection against these harmful rays, preventing the wood from deteriorating and maintaining its structural integrity.
Choosing the Right Paint for Your Boat
When it comes to choosing the right paint for your stitch and glue boat, there are several factors to consider. Firstly, you need to ensure that the paint is suitable for marine environments, as it will be constantly exposed to water, salt, and sunlight. Marine-grade paints are specifically formulated to withstand these harsh conditions and provide long-lasting protection.
Another important consideration is the type of paint. Two common types used for stitch and glue boats are one-part polyurethane paints and two-part epoxy paints. One-part polyurethane paints are easier to apply and provide a glossy finish, while two-part epoxy paints offer superior durability and resistance to abrasion. The choice between the two depends on your preferences and the level of protection you require.
Some recommended brands of paint for stitch and glue boats include Interlux, Pettit, and Epifanes. These brands have a proven track record in the marine industry and offer a wide range of colors and finishes to suit your preferences.
Preparing Your Boat for Painting
| Task | Time Required | Materials Needed | Cost |
| Cleaning the boat | 2-3 hours | Soap, water, scrub brush, hose | 0 |
| Sanding the boat | 4-6 hours | Sandpaper, sanding block, respirator mask | 20-30 |
| Repairing any damage | Varies | Fiberglass repair kit, epoxy, putty knife | 20-50 |
| Priming the boat | 2-3 hours | Primer, paintbrush, roller, paint tray | 50-100 |
| Painting the boat | 4-6 hours | Marine paint, paintbrush, roller, paint tray | 100-200 |
Before you can start painting your stitch and glue boat, it is essential to properly prepare the surface. This involves cleaning the boat, sanding it to create a smooth surface, filling any gaps or holes, and applying a primer.
Cleaning the boat involves removing any dirt, grease, or contaminants that may interfere with the adhesion of the paint. Use a mild detergent or boat cleaner and scrub the surface with a soft brush or sponge. Rinse thoroughly with clean water and allow it to dry completely before proceeding.
Sanding the boat is crucial to ensure that the paint adheres properly to the surface. Use a fine-grit sandpaper or sanding block to smooth out any rough areas or imperfections. Pay extra attention to the seams between the plywood panels to ensure they are flush and smooth.
Next, fill any gaps or holes with an epoxy-based filler specifically designed for marine applications. This will help create a seamless surface and prevent water from seeping into the wood. Follow the manufacturer’s instructions for mixing and applying the filler, and allow it to cure completely before proceeding.
Finally, apply a primer to create a strong bond between the paint and the boat’s surface. Choose a primer that is compatible with the type of paint you will be using. Apply the primer evenly using a brush or roller, following the manufacturer’s instructions for drying times and recoating.
Tips for Applying Primer
Applying a primer is an essential step in the painting process as it helps improve adhesion and enhances the durability of the paint. Here are some tips to ensure you achieve the best results when applying primer to your stitch and glue boat.
Firstly, make sure to choose a primer that is specifically formulated for marine applications. These primers are designed to withstand the harsh conditions of boating, including exposure to water, salt, and UV rays. Using a regular primer meant for interior or exterior use may not provide adequate protection.
Secondly, ensure that the surface is clean and properly prepared before applying the primer. Any dirt, grease, or contaminants can interfere with the adhesion of the primer and compromise its effectiveness. Follow the steps outlined in the previous section to clean, sand, and fill any gaps or holes before applying the primer.
When applying the primer, use a high-quality brush or roller that is suitable for the type of paint you will be using. A brush with synthetic bristles or a foam roller is often recommended for achieving a smooth and even application. Work in small sections, applying thin coats of primer and allowing each coat to dry completely before applying the next.
Tips for Applying Paint
Once you have applied the primer and it has dried thoroughly, it’s time to apply the paint to your stitch and glue boat. Here are some tips to ensure a successful paint job.
Choosing the right brush or roller is crucial for achieving a smooth and even finish. For smaller areas or intricate details, use a high-quality brush with synthetic bristles. This will allow you to have better control over the application and reach tight corners or edges. For larger areas, a foam roller is often recommended as it provides a smooth and consistent coverage.
It is important to apply the paint in the right conditions to ensure optimal adhesion and drying. Avoid painting in direct sunlight or extreme temperatures, as this can cause the paint to dry too quickly or not adhere properly. Ideally, choose a day with mild temperatures and low humidity for the best results.
Applying multiple coats of paint is necessary to achieve a durable and long-lasting finish. Follow the manufacturer’s instructions for drying times between coats, and make sure each coat is applied evenly and allowed to dry completely before applying the next. This will help build up a strong protective layer and enhance the appearance of your boat.
Avoiding common mistakes is essential to ensure a professional-looking paint job. Some common mistakes to watch out for include applying too thick of a coat, not allowing enough drying time between coats, or painting in unfavorable weather conditions. Take your time, follow the instructions, and be patient throughout the process to achieve the best results.
Painting the Hull of Your Boat
Painting the hull of your stitch and glue boat requires careful attention to detail to achieve a smooth and flawless finish. Here are some steps to follow when painting the hull.
Firstly, ensure that the hull is clean and properly prepared before applying any paint. Remove any dirt, grease, or contaminants using a mild detergent or boat cleaner. Rinse thoroughly with clean water and allow it to dry completely.
Next, sand the hull using a fine-grit sandpaper or sanding block to create a smooth surface. Pay extra attention to any rough areas or imperfections, as these can affect the final appearance of the paint. Wipe away any dust or debris with a clean cloth before proceeding.
Apply a primer specifically formulated for use on boat hulls. Follow the manufacturer’s instructions for mixing and applying the primer, ensuring that it is evenly distributed across the entire hull. Allow the primer to dry completely before proceeding with the paint.
When applying the paint, work in small sections and use long, even strokes to achieve a smooth and consistent coverage. Start from the top of the hull and work your way down, overlapping each stroke slightly to avoid visible brush or roller marks. Apply multiple thin coats of paint, allowing each coat to dry completely before applying the next.
To achieve a smooth finish, lightly sand the painted hull between coats using a fine-grit sandpaper. This will help remove any imperfections or brush marks and create a surface that is ready for the next coat of paint. Wipe away any dust or debris with a clean cloth before applying the next coat.
Painting the Deck of Your Boat
The deck of your stitch and glue boat is subjected to constant foot traffic and exposure to the elements, making it important to choose the right paint and apply it correctly. Here are some steps to follow when painting the deck.
Start by cleaning the deck thoroughly to remove any dirt, grease, or contaminants. Use a mild detergent or boat cleaner and scrub the surface with a soft brush or sponge. Rinse thoroughly with clean water and allow it to dry completely.
Sanding the deck is crucial to create a smooth surface for the paint to adhere to. Use a fine-grit sandpaper or sanding block to remove any rough areas or imperfections. Pay extra attention to any areas that may have been damaged or require additional filling. Wipe away any dust or debris with a clean cloth before proceeding.
Fill any gaps or holes in the deck using an epoxy-based filler specifically designed for marine applications. Follow the manufacturer’s instructions for mixing and applying the filler, ensuring that it is evenly distributed across the entire deck. Allow the filler to cure completely before proceeding with the paint.
Apply a primer specifically formulated for use on boat decks. Follow the manufacturer’s instructions for mixing and applying the primer, ensuring that it is evenly distributed across the entire deck. Allow the primer to dry completely before proceeding with the paint.
When applying the paint, work in small sections and use long, even strokes to achieve a smooth and consistent coverage. Start from one end of the deck and work your way towards the other, overlapping each stroke slightly to avoid visible brush or roller marks. Apply multiple thin coats of paint, allowing each coat to dry completely before applying the next.
To achieve a non-slip finish on the deck, consider adding a non-skid additive to the paint. This will provide additional grip and reduce the risk of slipping, especially when the deck is wet. Follow the manufacturer’s instructions for mixing and applying the non-skid additive, ensuring that it is evenly distributed across the entire deck.
Painting the Interior of Your Boat
The interior of your stitch and glue boat is where you spend most of your time, so it’s important to choose the right color and apply the paint correctly. Here are some steps to follow when painting the interior.
Start by cleaning the interior thoroughly to remove any dirt, dust, or debris. Use a mild detergent or boat cleaner and scrub the surfaces with a soft brush or sponge. Rinse thoroughly with clean water and allow it to dry completely.
Sanding the interior is important to create a smooth surface for the paint to adhere to. Use a fine-grit sandpaper or sanding block to remove any rough areas or imperfections. Pay extra attention to any areas that may have been damaged or require additional filling. Wipe away any dust or debris with a clean cloth before proceeding.
Fill any gaps or holes in the interior using an epoxy-based filler specifically designed for marine applications. Follow the manufacturer’s instructions for mixing and applying the filler, ensuring that it is evenly distributed across all surfaces. Allow the filler to cure completely before proceeding with the paint.
Apply a primer specifically formulated for use on boat interiors. Follow the manufacturer’s instructions for mixing and applying the primer, ensuring that it is evenly distributed across all surfaces. Allow the primer to dry completely before proceeding with the paint.
When choosing the color for the interior, consider factors such as lighting and personal preferences. Lighter colors can help create a sense of space and brightness, while darker colors can add a cozy and intimate atmosphere. Take into account the overall design and style of your boat to ensure a cohesive look.
When applying the paint, work in small sections and use long, even strokes to achieve a smooth and consistent coverage. Start from one end of the interior and work your way towards the other, overlapping each stroke slightly to avoid visible brush or roller marks. Apply multiple thin coats of paint, allowing each coat to dry completely before applying the next.
Download over 500 Boat Plans. Click on the link below.
-->Click Here<--
Maintaining Your Painted Stitch and Glue Boat
Once you have completed painting your stitch and glue boat, it is important to maintain it properly to ensure its longevity and appearance. Regular cleaning and maintenance, as well as touching up any scratches or chips, are essential tasks to keep your boat in top condition.
Regularly clean your boat using a mild detergent or boat cleaner to remove any dirt, salt, or grime that may accumulate on the surface. Rinse thoroughly with clean water after cleaning and dry it completely to prevent water spots or streaks.
Inspect your boat regularly for any scratches or chips in the paint. These areas can be vulnerable to water damage and should be touched up as soon as possible. Use a small brush or touch-up pen with matching paint to fill in any imperfections. Allow the touch-up paint to dry completely before exposing it to water or sunlight.
Depending on the level of wear and tear, you may need to repaint your boat after a certain period. Signs that indicate it’s time for repainting include significant fading of the color, peeling or cracking of the paint, or visible damage to the surface. Follow the steps outlined in this article to properly prepare the boat for repainting and ensure a long-lasting finish.
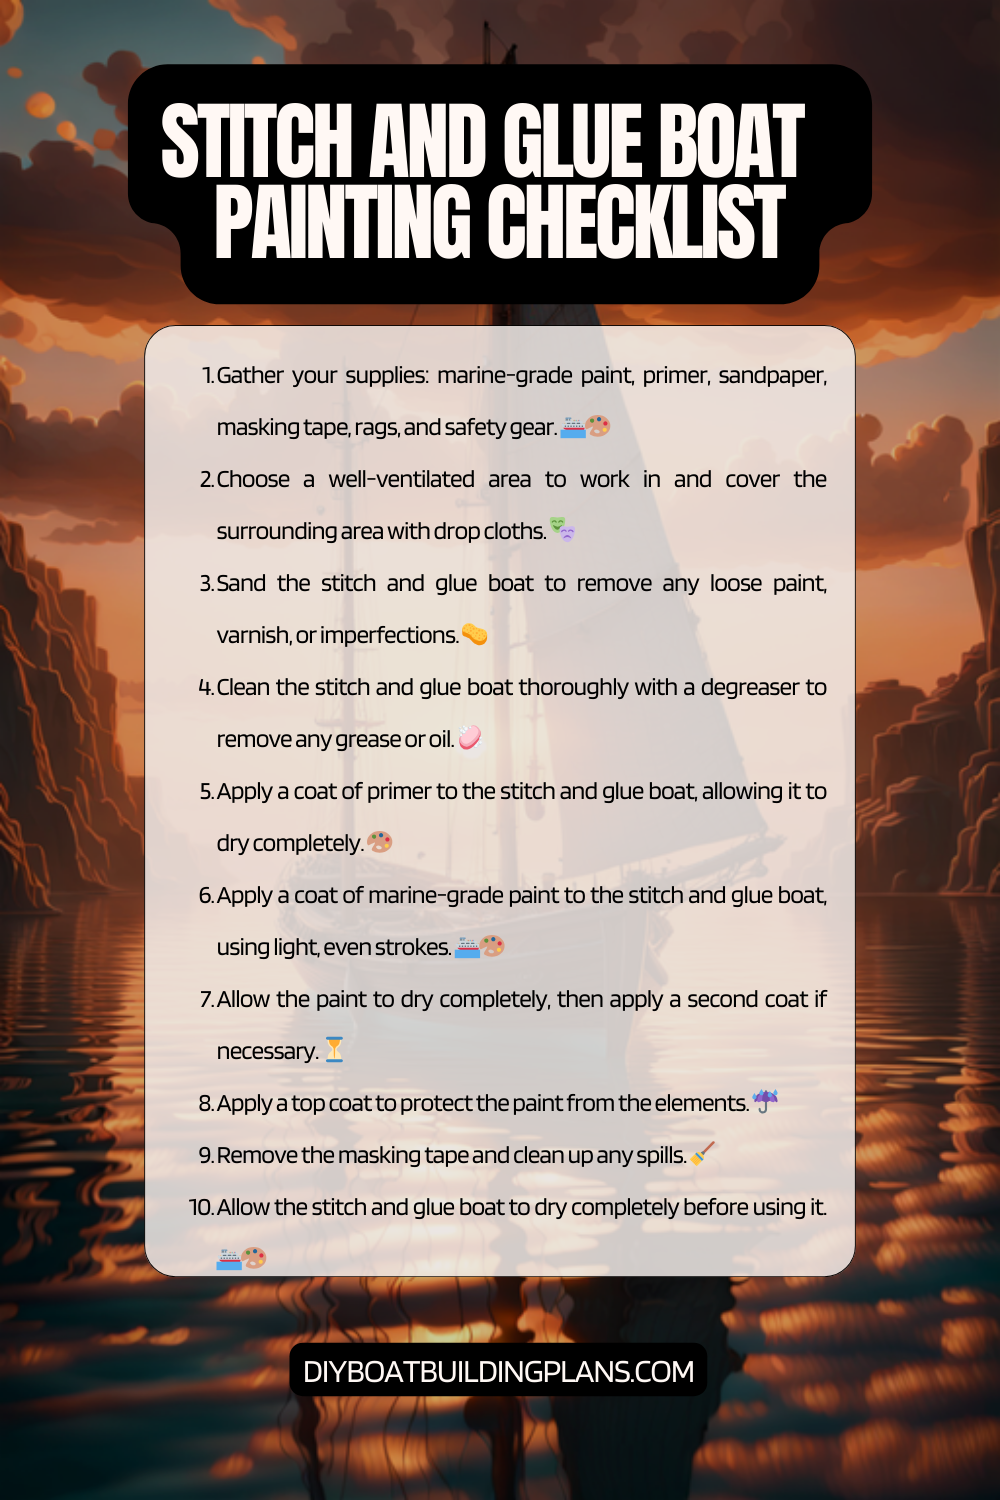
Stitch and Glue Boat Painting Checklist
Conclusion – Stitch and Glue Boat Painting Tips
In conclusion, painting your stitch and glue boat is not only about enhancing its appearance but also about protecting it from water damage and UV rays. By choosing the right paint, properly preparing the surface, and following the correct application techniques, you can ensure a durable and long-lasting finish.
Remember to clean and sand the boat before applying a primer, and choose a high-quality marine-grade paint that is suitable for your specific needs. Take your time when applying the paint, working in small sections and applying multiple thin coats for the best results.
Maintaining your painted stitch and glue boat is equally important. Regular cleaning and maintenance, as well as touching up any scratches or chips, will help prolong the lifespan of your boat and keep it looking its best.
By following these tips and steps, you can enjoy your stitch and glue boat for years to come, knowing that it is protected and well-maintained. So go ahead, take care of your boat, and embark on countless adventures on the water!
FAQs
What is stitch and glue boat building?
Stitch and glue boat building is a method of boat construction that involves stitching panels of plywood together with copper wire and then gluing the seams with epoxy resin.
Why is painting important for stitch and glue boats?
Painting is important for stitch and glue boats because it helps to protect the plywood from water damage and UV rays. It also enhances the appearance of the boat.
What type of paint should be used for stitch and glue boats?
The type of paint that should be used for stitch and glue boats depends on personal preference and the intended use of the boat. Some popular options include marine enamel, two-part polyurethane, and epoxy-based paints.
What are some tips for preparing the boat for painting?
Some tips for preparing the boat for painting include sanding the surface to remove any rough spots or imperfections, cleaning the surface with a solvent to remove any dirt or grease, and applying a primer to help the paint adhere better.
How should the paint be applied?
The paint should be applied in thin, even coats using a brush or roller. It is important to follow the manufacturer’s instructions for application and drying times.
How many coats of paint should be applied?
The number of coats of paint that should be applied depends on the type of paint being used and the desired level of protection. Generally, two to three coats of paint are recommended.
How long does the paint take to dry?
The drying time for paint depends on the type of paint being used and the temperature and humidity of the environment. Generally, it takes 24 to 48 hours for the paint to dry completely.