

Overview of Stitch and Glue Boat Polishing Tips
Stitch and glue boat building is a popular method used by boat enthusiasts to construct small boats. This technique involves stitching together plywood panels and then gluing them together to create a strong and durable boat hull. The process is relatively simple and requires minimal tools and materials, making it accessible to both experienced builders and beginners.
Key Takeaways
- Stitch and glue boat building is a popular method for constructing small boats.
- Polishing your boat is important to maintain its appearance and protect it from the elements.
- Materials needed for polishing include a polishing compound, buffing pad, and microfiber cloth.
- Before polishing, it’s important to clean and dry your boat thoroughly.
- Common mistakes to avoid include using too much pressure while buffing and not using enough polishing compound.

Importance of Polishing Your Boat
Polishing your boat is an essential step in boat maintenance that should not be overlooked. Not only does it enhance the appearance of your boat, but it also provides several other benefits. One of the main advantages of polishing your boat is the protection it offers against UV rays and saltwater damage. The sun’s harmful UV rays can cause the paint or gel coat on your boat to fade and deteriorate over time. By regularly polishing your boat, you create a protective barrier that helps shield the surface from these damaging effects.
In addition to protection, polishing your boat also improves its overall appearance. A well-polished boat shines and sparkles, giving it a fresh and well-maintained look. This can be particularly important if you plan on selling your boat in the future, as a well-maintained and polished boat will have a higher resale value compared to one that has been neglected.
Materials Needed for Polishing
Before you begin polishing your boat, it’s important to gather all the necessary materials. Some of the essential items you will need include a polishing compound, buffing pads, microfiber towels, and a buffing machine. The polishing compound is the key ingredient that helps remove oxidation, scratches, and other imperfections from the surface of your boat. Buffing pads are used in conjunction with the polishing compound to evenly distribute it across the surface of the boat. Microfiber towels are used for wiping away excess compound and achieving a final shine. Lastly, a buffing machine can be used to speed up the polishing process and ensure a consistent finish.
Preparing Your Boat for Polishing
| Task | Frequency | Time Required |
| Clean boat exterior | Before polishing | 2-3 hours |
| Remove oxidation | As needed | 4-6 hours |
| Apply rubbing compound | As needed | 2-3 hours |
| Apply polishing compound | As needed | 2-3 hours |
| Apply wax | Every 3-6 months | 4-6 hours |
Before you start applying the polishing compound, it’s crucial to prepare your boat properly. Begin by cleaning the boat thoroughly, removing any dirt, grime, or debris that may be present on the surface. This can be done using a mild detergent and water solution, along with a soft brush or sponge. Pay close attention to hard-to-reach areas and crevices where dirt can accumulate. Once the boat is clean, rinse it thoroughly with fresh water to remove any soap residue. Finally, make sure the boat is completely dry before proceeding with the polishing process.
Choosing the Right Polishing Compound
Choosing the right polishing compound for your boat is essential to achieve the desired results. There are different types of polishing compounds available on the market, each designed for specific purposes. Factors to consider when selecting a polishing compound include the type of surface you are working with (gel coat, paint, etc.), the level of oxidation or damage present, and personal preference. It’s recommended to start with a less aggressive compound and gradually increase the level of abrasiveness if needed. This will help prevent any potential damage to the surface of your boat.
Applying the Polishing Compound
Once you have selected the appropriate polishing compound, it’s time to apply it to your boat. Start by applying a small amount of compound onto a clean buffing pad. Using a circular motion, spread the compound evenly across a small section of the boat’s surface. It’s important to work in small sections to ensure that the compound does not dry out before it can be properly buffed. Apply light pressure and let the compound do the work. Continue this process until you have covered the entire surface of your boat.
Buffing Your Boat
After applying the polishing compound, it’s time to buff your boat to achieve a high-gloss shine. Using a clean buffing pad attached to a buffing machine, work in small circular motions to evenly distribute the compound and remove any remaining oxidation or imperfections. It’s important to keep the buffing pad moving at all times to avoid overheating the surface of the boat. As you buff, periodically check the surface for any areas that may require additional attention. Once you are satisfied with the shine, use a clean microfiber towel to wipe away any excess compound and reveal the final polished surface.
Removing Scratches and Stains
If your boat has scratches or stains that cannot be removed through polishing alone, there are additional steps you can take to address these issues. For minor scratches, a rubbing compound can be used to gently remove the damaged layer of paint or gel coat. Apply the rubbing compound to a clean cloth and rub it onto the affected area using light pressure. For deeper scratches, sandpaper may be necessary. Start with a fine-grit sandpaper and gradually move to a finer grit until the scratch is no longer visible. Remember to always follow the manufacturer’s instructions when using any chemical or abrasive products on your boat.
Download over 500 Boat Plans. Click on the link below.
-->Click Here<--
Maintaining Your Boat’s Shine
Once you have achieved a perfect shine on your stitch and glue boat, it’s important to maintain it to prolong its longevity. Regular cleaning and polishing are key to preserving the shine and protecting the surface from further damage. After each outing, rinse your boat with fresh water to remove any saltwater or debris that may have accumulated. Avoid using harsh chemicals or abrasive cleaners that can strip away the protective layer of polish. Instead, opt for mild detergents specifically formulated for boat cleaning. Additionally, consider applying a wax or sealant after each polishing session to provide an extra layer of protection against UV rays and saltwater damage.
Common Mistakes to Avoid
While polishing your boat can be a rewarding process, there are some common mistakes that should be avoided. One of the most common mistakes is using too much pressure when applying the polishing compound or buffing the surface. This can lead to overheating and potentially damaging the gel coat or paint. It’s important to let the compound do the work and use light pressure when buffing. Another mistake is not working in small sections, which can cause the compound to dry out before it can be properly buffed. By working in small sections, you ensure that the compound remains moist and effective throughout the entire process.
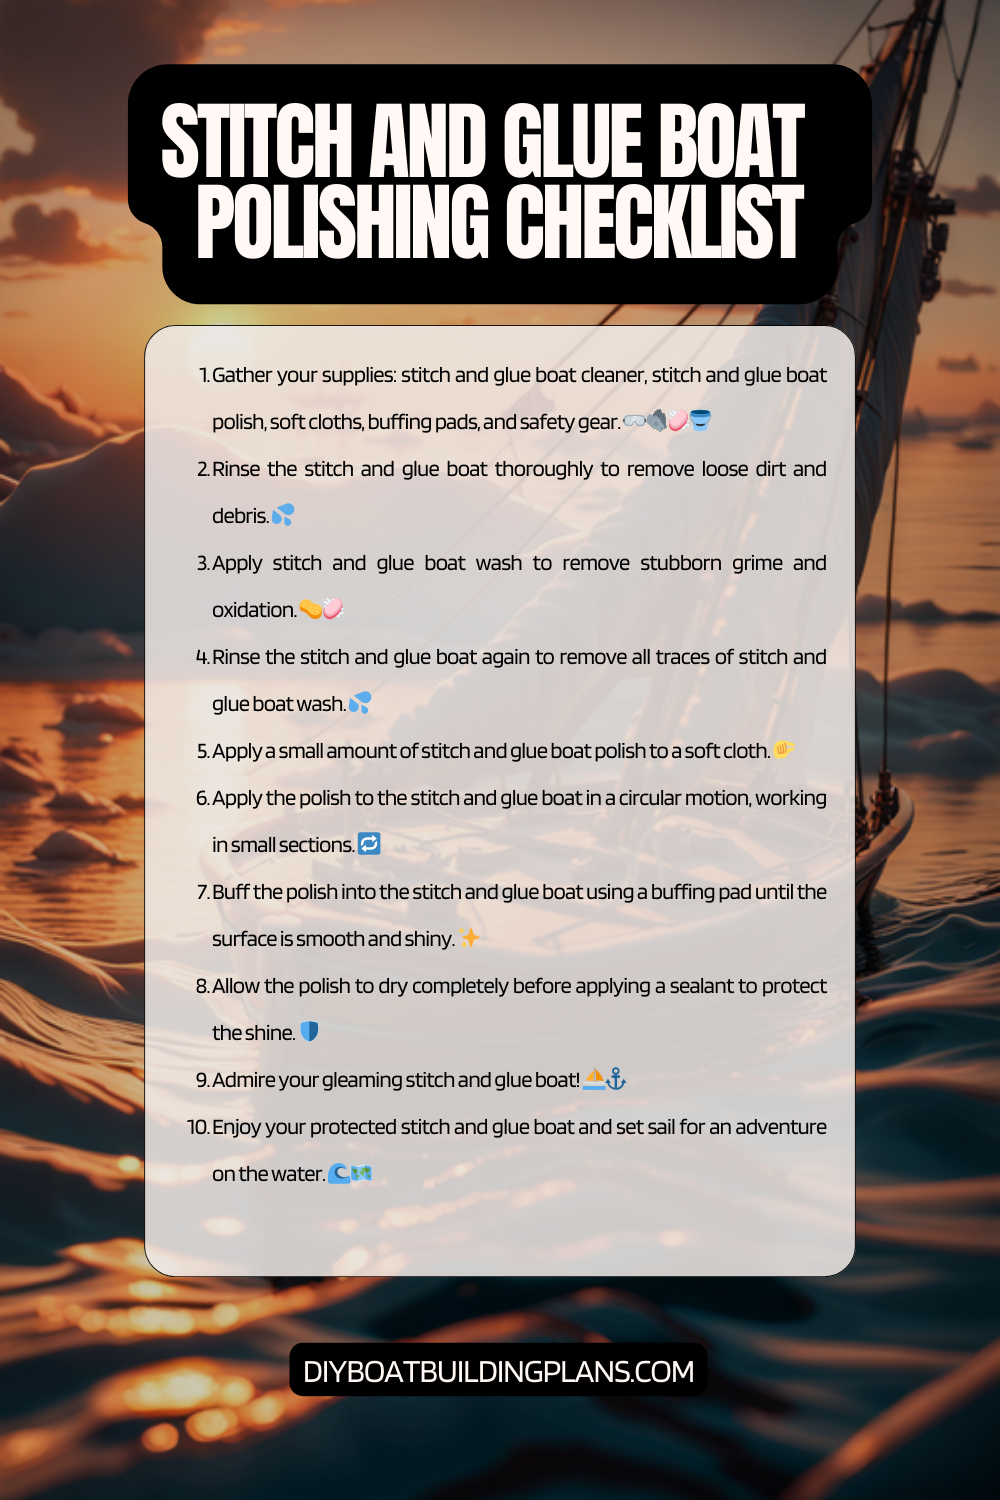
Stitch and Glue Boat Polishing Checklist
Conclusion – Stitch and Glue Boat Polishing Tips
In conclusion, polishing your stitch and glue boat is an essential step in boat maintenance that offers numerous benefits. Not only does it protect your boat from UV rays and saltwater damage, but it also enhances its appearance and resale value. By following the proper steps and using the right materials, you can achieve a perfect shine on your boat’s surface. Remember to choose the appropriate polishing compound, prepare your boat thoroughly, and apply the compound evenly. Buffing your boat with a buffing machine will help achieve a consistent finish, while removing scratches and stains will further improve its overall appearance. Finally, regular maintenance and avoiding common mistakes will ensure that your boat’s shine lasts for years to come.
FAQs – Stitch and Glue Boat Polishing Tips
What is stitch and glue boat building?
Stitch and glue boat building is a method of boat construction that involves stitching panels of plywood together with copper wire and then gluing the seams with epoxy resin.
Why is polishing important for stitch and glue boats?
Polishing is important for stitch and glue boats because it helps to protect the epoxy resin from UV damage and oxidation, which can cause the boat to deteriorate over time. Polishing also helps to improve the appearance of the boat.
What materials are needed for polishing a stitch and glue boat?
Materials needed for polishing a stitch and glue boat include a buffer or polisher, polishing pads, rubbing compound, and wax.
What is the process for polishing a stitch and glue boat?
The process for polishing a stitch and glue boat involves washing the boat with soap and water, using rubbing compound to remove any oxidation or scratches, and then applying wax to protect the surface.
How often should a stitch and glue boat be polished?
The frequency of polishing a stitch and glue boat depends on how often the boat is used and the conditions it is exposed to. Generally, it is recommended to polish the boat at least once a year to maintain its appearance and protect the epoxy resin.