

Overview of Row Boat Painting Tips
Maintaining the paint job on a row boat is essential for both its appearance and functionality. A well-painted row boat not only looks aesthetically pleasing but also protects the boat from the damaging effects of water, sun, and other environmental factors. The paint acts as a barrier, preventing water from seeping into the wood and causing rot or decay. Additionally, a well-maintained paint job can enhance the performance of the row boat by reducing drag and improving its overall efficiency.
Key Takeaways
- Choose the right paint for your row boat to ensure durability and longevity.
- Properly prepare and sand your row boat before painting for a smooth finish.
- Use primer for better adhesion and to prevent paint from peeling or chipping.
- Apply paint carefully and evenly, especially when painting the bottom and interior of your row boat.
- Regular maintenance is key to keeping your row boat’s paint job looking professional and lasting for years to come.

Choosing the Right Paint for Your Row Boat
When it comes to choosing the right paint for your row boat, there are several factors to consider. Firstly, you need to select a paint that is suitable for marine environments. Marine paints are specifically designed to withstand constant exposure to water, UV rays, and saltwater corrosion. There are different types of marine paints available, such as oil-based paints, epoxy paints, and polyurethane paints. Each type has its own advantages and disadvantages, so it’s important to research and choose the one that best suits your needs.
Other factors to consider when choosing paint include color options, durability, ease of application, and compatibility with other coatings or primers you may be using. It’s also worth considering whether you want a glossy or matte finish, as this can affect the overall appearance of your row boat.
Preparing Your Row Boat for Painting
Before you can start painting your row boat, it’s crucial to properly prepare the surface. This involves cleaning the boat thoroughly to remove any dirt, grime, or contaminants that may interfere with the adhesion of the paint. Use a mild detergent or boat cleaner and scrub the surface with a soft brush or sponge. Rinse off the cleaning solution with fresh water and allow the boat to dry completely.
Next, you’ll need to remove any old paint that may be peeling or flaking. This can be done using a scraper or sandpaper, depending on the condition of the existing paint. Be sure to wear protective gloves and a mask to avoid inhaling any dust or particles. Once the old paint has been removed, inspect the boat for any damages or imperfections that need to be repaired before painting.
Sanding Your Row Boat for a Smooth Finish
| Step | Description | Time Required |
|---|---|---|
| 1 | Remove any old paint or varnish with a scraper or sandpaper | 1-2 hours |
| 2 | Sand the boat with coarse sandpaper to remove any rough spots or imperfections | 2-3 hours |
| 3 | Switch to a finer grit sandpaper and sand the boat again to create a smooth surface | 2-3 hours |
| 4 | Wipe down the boat with a damp cloth to remove any dust or debris | 30 minutes |
| 5 | Apply a coat of primer to the boat to help the paint adhere better | 1-2 hours |
| 6 | Sand the boat again with a fine grit sandpaper to create an even smoother surface | 2-3 hours |
| 7 | Apply the final coat of paint or varnish to the boat | 2-3 hours |
| 8 | Allow the boat to dry completely before using it | 24-48 hours |
Sanding is a crucial step in achieving a smooth and even finish on your row boat. It helps to remove any remaining traces of old paint, smooth out rough surfaces, and create a clean and receptive surface for the new paint to adhere to. To sand your row boat, you’ll need various grits of sandpaper, ranging from coarse to fine.
Start with a coarse-grit sandpaper to remove any stubborn paint or rough spots. Use long, even strokes and work in the direction of the wood grain. As you progress, switch to finer-grit sandpaper to achieve a smoother finish. Be sure to sand all areas of the boat, including hard-to-reach corners and edges.
Priming Your Row Boat for Better Adhesion
Priming your row boat is an important step that helps improve the adhesion of the paint and enhances its durability. Primers create a strong bond between the surface and the paint, preventing peeling or flaking in the future. There are different types of primers available, such as epoxy primers, zinc chromate primers, and self-etching primers. The choice of primer depends on the type of paint you’re using and the condition of your row boat.
Before applying primer, make sure the surface is clean and dry. Use a brush or roller to apply an even coat of primer, following the manufacturer’s instructions regarding drying time and number of coats required. Allow the primer to dry completely before moving on to the next step.
Applying Paint to Your Row Boat
Now that your row boat is properly prepared and primed, it’s time to apply the paint. There are various techniques you can use to achieve a smooth and professional-looking finish. One common technique is to use a brush for smaller areas and a roller for larger surfaces. Brushes allow for more control and precision, while rollers cover larger areas quickly and evenly.
When applying paint, start from the top of the boat and work your way down, using long, even strokes. Be sure to overlap each stroke slightly to avoid leaving any gaps or streaks. Apply multiple thin coats rather than one thick coat, allowing each coat to dry completely before applying the next. This will help prevent drips or runs in the paint.
Tips for Painting the Bottom of Your Row Boat
Painting the bottom of your row boat is just as important as painting the rest of it. The bottom is constantly exposed to water, which can lead to damage if not properly protected. To paint the bottom, you’ll need to lift the boat or turn it upside down, depending on its size and design.
When painting the bottom, it’s crucial to choose a paint that is specifically formulated for underwater use. These paints are designed to withstand constant immersion in water and provide protection against algae, barnacles, and other marine organisms. Apply the paint using a brush or roller, following the manufacturer’s instructions regarding drying time and number of coats required.
Painting the Interior of Your Row Boat
While the exterior of your row boat may be more visible, it’s equally important to paint the interior. Painting the interior not only enhances its appearance but also provides an additional layer of protection against moisture and rot. Before painting the interior, make sure it is clean and dry.
To paint the interior, use a brush or roller and apply an even coat of paint. Pay special attention to areas that are prone to moisture or wear, such as the seats, floorboards, and gunwales. Allow the paint to dry completely before using the boat.
Painting the Exterior of Your Row Boat
The exterior of your row boat is what most people will see, so it’s important to give it a fresh and appealing look. Before painting the exterior, make sure it is clean and free from any dust or debris. If necessary, sand the surface lightly to create a smooth and receptive surface for the paint.
When painting the exterior, follow the same techniques mentioned earlier, using a brush or roller to apply multiple thin coats of paint. Be sure to cover all areas evenly, including the sides, bow, stern, and gunwales. Allow each coat to dry completely before applying the next.
Tips for Achieving a Professional-Looking Finish
To achieve a professional-looking finish on your row boat, there are several tips you can follow. Firstly, make sure you have the right tools for the job. High-quality brushes and rollers will help you achieve a smoother and more even application of paint. Additionally, using masking tape or painter’s tape can help create clean and sharp lines between different colors or sections of the boat.
Secondly, take your time and be patient. Rushing through the painting process can lead to mistakes or uneven coverage. Allow each coat of paint to dry completely before applying the next, and don’t be tempted to apply thick coats in an attempt to finish faster.
Lastly, pay attention to detail. Take the time to inspect your work after each coat of paint has dried and make any necessary touch-ups or corrections. This will ensure a flawless finish that will make your row boat stand out.
Download over 500 Boat Plans. Click on the link below.
-->Click Here<--
Maintaining Your Row Boat’s Paint Job
Once you’ve invested time and effort into painting your row boat, it’s important to maintain its paint job to ensure its longevity. Regular maintenance can help prevent peeling, fading, or other forms of paint deterioration. Here are some tips for maintaining your row boat’s paint job:
1. Clean the boat regularly: Use a mild detergent or boat cleaner to remove dirt, salt, and other contaminants from the surface of the boat. Rinse thoroughly with fresh water and dry with a soft cloth.
2. Inspect for damages: Regularly inspect your row boat for any damages or imperfections in the paint. Touch up any chips or scratches as soon as possible to prevent further damage.
3. Avoid harsh chemicals: Avoid using harsh chemicals or abrasive cleaners on your row boat, as they can damage the paint. Stick to mild detergents and non-abrasive cleaning tools.
4. Store properly: When not in use, store your row boat in a dry and covered area to protect it from the elements. If storing outdoors, use a boat cover to shield it from UV rays and rain.
Common Mistakes to Avoid When Painting Your Row Boat
While painting a row boat may seem straightforward, there are some common mistakes that people often make. By being aware of these mistakes, you can avoid them and achieve a better result. Here are some common mistakes to avoid when painting your row boat:
1. Skipping proper preparation: Properly preparing the surface of your row boat is crucial for achieving a long-lasting paint job. Skipping steps like cleaning, sanding, and priming can lead to poor adhesion and premature paint failure.
2. Applying too thick coats: Applying thick coats of paint may seem like a time-saving technique, but it can lead to drips, runs, and uneven coverage. It’s better to apply multiple thin coats, allowing each coat to dry completely before applying the next.
3. Neglecting maintenance: Once you’ve painted your row boat, it’s important to maintain its paint job regularly. Neglecting maintenance can lead to peeling, fading, or other forms of paint deterioration.
4. Using the wrong type of paint: Using the wrong type of paint for your row boat can result in poor adhesion, premature paint failure, or a finish that is not suitable for marine environments. Make sure to choose a paint that is specifically designed for boats and marine applications.
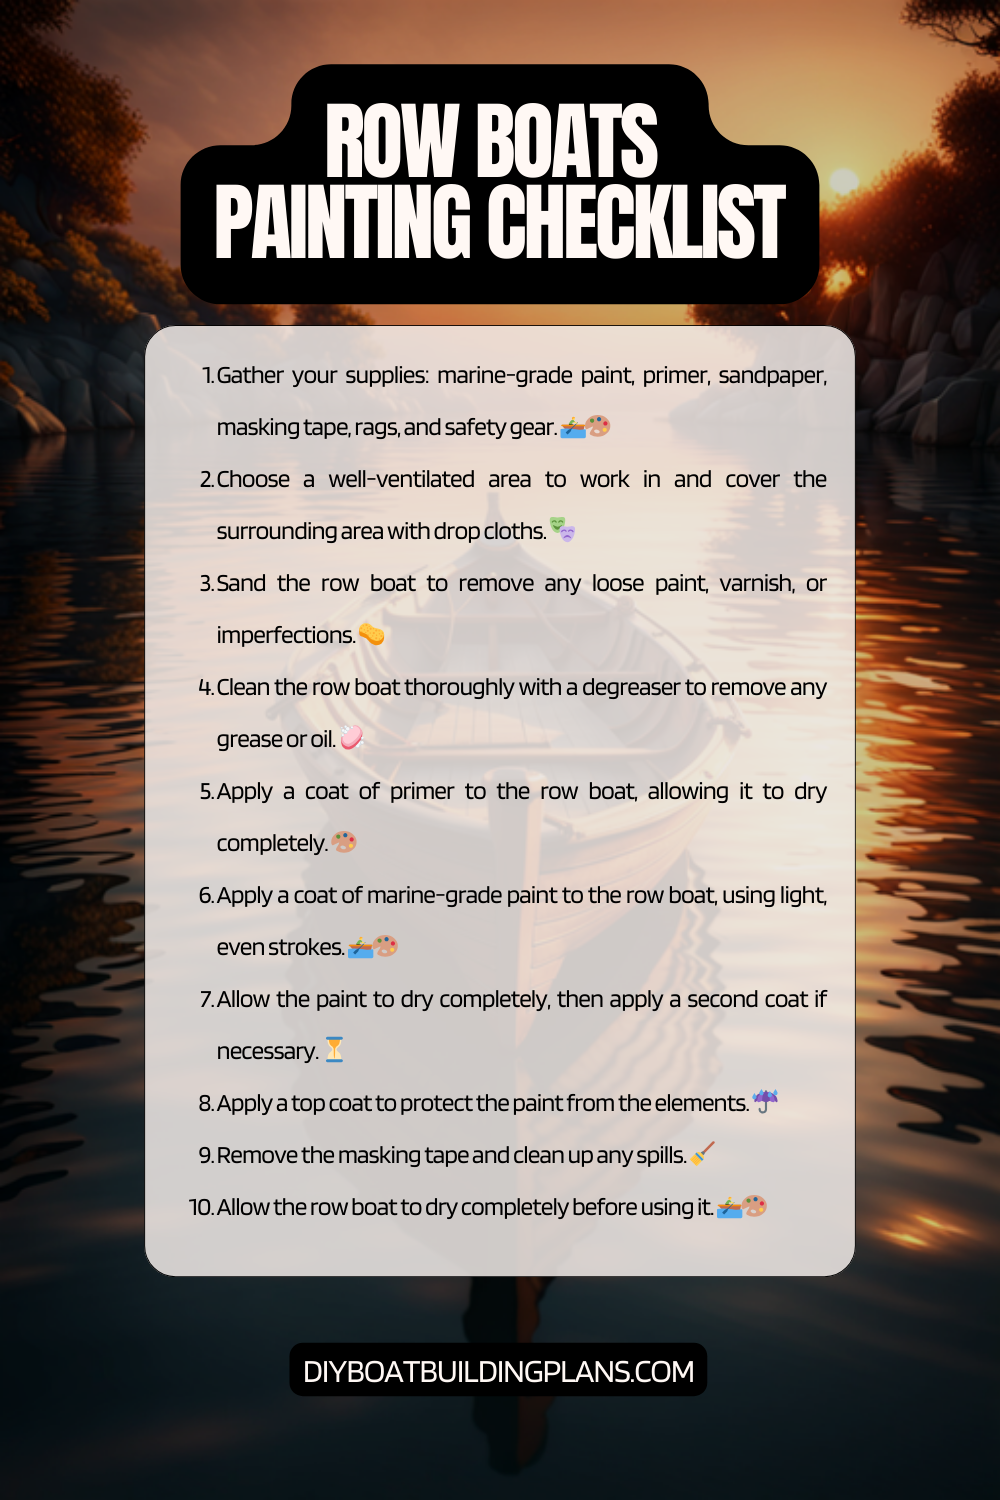
Row Boat Painting Checklist
Conclusion – Row Boat Painting Tips
In conclusion, painting your row boat is not only important for its appearance but also for its protection and performance. By choosing the right paint, properly preparing the surface, and following the correct techniques, you can achieve a professional-looking finish that will enhance the overall look and durability of your row boat.
Remember to take your time, be patient, and pay attention to detail throughout the painting process. Regular maintenance is also crucial for preserving the paint job and preventing any potential damage. By following these tips and avoiding common mistakes, you can enjoy a well-painted row boat that will stand the test of time.
FAQs – Row Boat Painting Tips
What is row boat painting?
Row boat painting is the process of applying paint to the exterior of a row boat to protect it from the elements and enhance its appearance.
What are some tips for preparing a row boat for painting?
Before painting a row boat, it is important to clean and sand the surface to remove any dirt, grime, or old paint. It is also recommended to use a primer to ensure the paint adheres properly.
What type of paint should be used for row boat painting?
Marine-grade paint is recommended for row boat painting as it is designed to withstand exposure to water and sunlight. Oil-based paints are also commonly used for their durability.
How many coats of paint should be applied to a row boat?
It is recommended to apply at least two coats of paint to a row boat, allowing each coat to dry completely before applying the next.
What are some tips for achieving a smooth and even paint finish?
To achieve a smooth and even paint finish, it is important to use a high-quality paintbrush or roller and to apply the paint in thin, even coats. It is also recommended to sand between coats to remove any imperfections.
How long does it take for row boat paint to dry?
The drying time for row boat paint can vary depending on the type of paint and environmental conditions. Generally, it can take anywhere from a few hours to a few days for the paint to dry completely.