

Overview of Plywood Boat Painting Tips
Painting a plywood boat is an essential step in maintaining its longevity and appearance. Whether you use your boat for recreational purposes or rely on it for professional use, painting can protect the plywood from the damaging effects of water, sunlight, and other environmental factors. Additionally, a well-painted boat can enhance its aesthetic appeal and make it stand out on the water.
One of the key benefits of painting a plywood boat is the protection it provides against moisture. Plywood is susceptible to water damage, which can lead to rotting and weakening of the structure over time. By applying a waterproof paint, you create a barrier that prevents water from seeping into the wood, thus extending its lifespan. Furthermore, painting your boat can also shield it from harmful UV rays, which can cause fading and deterioration of the plywood.
Key Takeaways
- Choosing the right paint is crucial for a successful plywood boat painting project.
- Proper preparation, including sanding and priming, is key to achieving a smooth and professional-looking finish.
- Avoid common mistakes such as rushing the process or using the wrong type of paint.
- Regular maintenance is necessary to keep your plywood boat’s paint job looking great.
- With the right techniques and attention to detail, anyone can achieve a beautiful and long-lasting paint job on their plywood boat.
Choosing the Right Paint for Your Plywood Boat
When it comes to choosing the right paint for your plywood boat, there are several factors to consider. Firstly, you need to decide between oil-based and water-based paints. Oil-based paints offer better durability and protection against moisture, but they can be more challenging to work with and require proper ventilation during application. On the other hand, water-based paints are easier to clean up and have lower levels of volatile organic compounds (VOCs), making them more environmentally friendly.
Another important consideration is the type of paint finish you desire. Glossy finishes provide a high shine and are easier to clean, but they may show imperfections more prominently. Satin or semi-gloss finishes offer a compromise between shine and durability, while matte finishes provide a more subtle look but may be less resistant to wear and tear.
Preparing Your Plywood Boat for Painting
Properly preparing your plywood boat before painting is crucial for achieving a long-lasting and professional-looking finish. Begin by thoroughly cleaning the boat’s surface to remove any dirt, grime, or old paint. Use a mild detergent and a scrub brush or sponge to scrub away any debris. Rinse the boat with clean water and allow it to dry completely before proceeding.
Next, inspect the plywood for any signs of damage or rot. Repair any cracks, holes, or soft spots using an appropriate wood filler or epoxy. Sand down rough areas and remove any loose or peeling paint. It is essential to have a smooth and clean surface before applying new paint.
Sanding Techniques for a Smooth Finish
| Hand Sanding | Sanding by hand using sandpaper or sanding blocks. | Controlled sanding, good for small areas, inexpensive. | Time-consuming, can cause uneven sanding, can be tiring. |
| Power Sanding | Sanding using a power tool such as an orbital sander or belt sander. | Efficient, saves time, good for large areas. | Can be expensive, can cause damage if not used properly, can be noisy. |
| Wet Sanding | Sanding using water to lubricate the sandpaper and reduce dust. | Produces a smooth finish, reduces dust, good for finishing coats. | Can be messy, requires more time and effort, can cause rust if not dried properly. |
| Dry Sanding | Sanding without water or lubrication. | Good for rough sanding, can be done quickly, less messy. | Produces more dust, can cause scratches, not suitable for finishing coats. |
Sanding your plywood boat is a critical step in achieving a smooth and even paint finish. Start by using coarse-grit sandpaper to remove any rough patches or imperfections on the surface. Work in the direction of the wood grain, applying even pressure. As you progress, switch to finer-grit sandpaper to create a smoother surface.
To ensure an even finish, consider using a sanding block or an electric sander. These tools can help maintain consistent pressure and prevent uneven sanding. Pay extra attention to edges and corners, as they can be more challenging to sand properly.
Applying Primer to Your Plywood Boat
Applying primer is essential for promoting adhesion between the plywood and the paint, as well as providing an additional layer of protection. Choose a primer specifically designed for marine applications, as it will offer better resistance to water and other harsh conditions.
Before applying the primer, make sure the boat’s surface is clean and dry. Use a brush or roller to apply an even coat of primer, following the manufacturer’s instructions regarding drying time and number of coats required. Allow the primer to dry completely before moving on to the next step.
Tips for Painting Your Plywood Boat
To achieve a professional-looking paint job on your plywood boat, consider the following tips:
1. Use high-quality marine-grade paint: Invest in a paint specifically formulated for marine applications. These paints are designed to withstand the harsh conditions of boating and provide long-lasting protection.
2. Apply multiple thin coats: Instead of applying one thick coat, it is better to apply multiple thin coats of paint. This allows for better adhesion and a smoother finish.
3. Use the right tools: Choose brushes and rollers that are suitable for the type of paint you are using. Synthetic brushes are often recommended for water-based paints, while natural bristle brushes work well with oil-based paints.
4. Work in a well-ventilated area: Proper ventilation is crucial when painting, especially if you are using oil-based paints. Ensure that you have adequate airflow to prevent the buildup of fumes.
5. Take your time: Rushing through the painting process can lead to mistakes and an uneven finish. Take your time and apply each coat carefully, allowing sufficient drying time between coats.
How to Achieve a Professional-Looking Paint Job
Achieving a professional-looking paint job on your plywood boat requires attention to detail and proper technique. Here are some techniques to consider:
1. Brushing vs. rolling: Depending on the size and shape of your boat, you may choose to use either a brush or a roller for painting. Brushes are ideal for smaller areas and intricate details, while rollers can cover larger surfaces more quickly.
2. Feathering technique: When using a brush, employ the feathering technique to avoid visible brush strokes. Start by applying paint with light pressure, then gradually increase pressure as you move along, feathering out the edges.
3. Wet-on-wet technique: To achieve a seamless finish, consider using the wet-on-wet technique. This involves applying a new coat of paint while the previous coat is still wet or tacky. It helps blend the layers together and reduces the appearance of brush or roller marks.
4. Back-rolling: If you choose to use a roller, consider back-rolling to achieve a smoother finish. After applying paint with the roller, lightly roll over the painted area in the opposite direction to remove any excess texture or bubbles.
5. Avoid overbrushing: Overbrushing can lead to visible brush marks and an uneven finish. Apply paint in long, smooth strokes, and avoid going back over areas that have already been painted.
Common Mistakes to Avoid When Painting Your Plywood Boat
To ensure a successful paint job on your plywood boat, it is important to avoid common mistakes that can compromise the final result. Here are some mistakes to watch out for:
1. Skipping surface preparation: Failing to properly clean and prepare the plywood before painting can result in poor adhesion and premature paint failure. Take the time to clean, repair, and sand the surface as necessary.
2. Applying too thick of a coat: Applying paint too thickly can lead to drips, runs, and an uneven finish. Follow the manufacturer’s instructions regarding recommended thickness and number of coats.
3. Painting in unfavorable weather conditions: Painting in extreme temperatures or high humidity can affect the drying time and adhesion of the paint. Choose a day with moderate temperatures and low humidity for optimal results.
4. Neglecting proper ventilation: Fumes from oil-based paints can be harmful if inhaled in large quantities. Ensure that you are working in a well-ventilated area or use appropriate respiratory protection.
5. Rushing the drying process: Patience is key when it comes to drying time between coats. Rushing the process can lead to smudging, smearing, or lifting of the previous coat.
Maintaining Your Plywood Boat’s Paint Job
Maintaining your plywood boat‘s paint job is essential for preserving its appearance and protecting it from deterioration. Here are some tips for keeping your boat’s paint job looking new:
1. Regular cleaning: Wash your boat regularly with mild soap and water to remove dirt, salt, and other contaminants that can degrade the paint. Avoid using abrasive cleaners or brushes that can scratch the surface.
2. Waxing: Apply a marine-grade wax to the painted surface to provide an additional layer of protection against UV rays and water. Waxing also helps maintain the shine and luster of the paint.
3. Touch-ups: Keep an eye out for any chips, scratches, or areas of paint that have worn off. Promptly touch up these areas with matching paint to prevent further damage.
4. Avoid harsh chemicals: Avoid using harsh chemicals or solvents on the painted surface, as they can strip away the protective layers and damage the paint.
5. Store properly: When not in use, store your plywood boat in a covered area or use a boat cover to protect it from the elements. This will help prevent fading and deterioration of the paint.
Download over 500 Boat Plans. Click on the link below.
-->Click Here<--
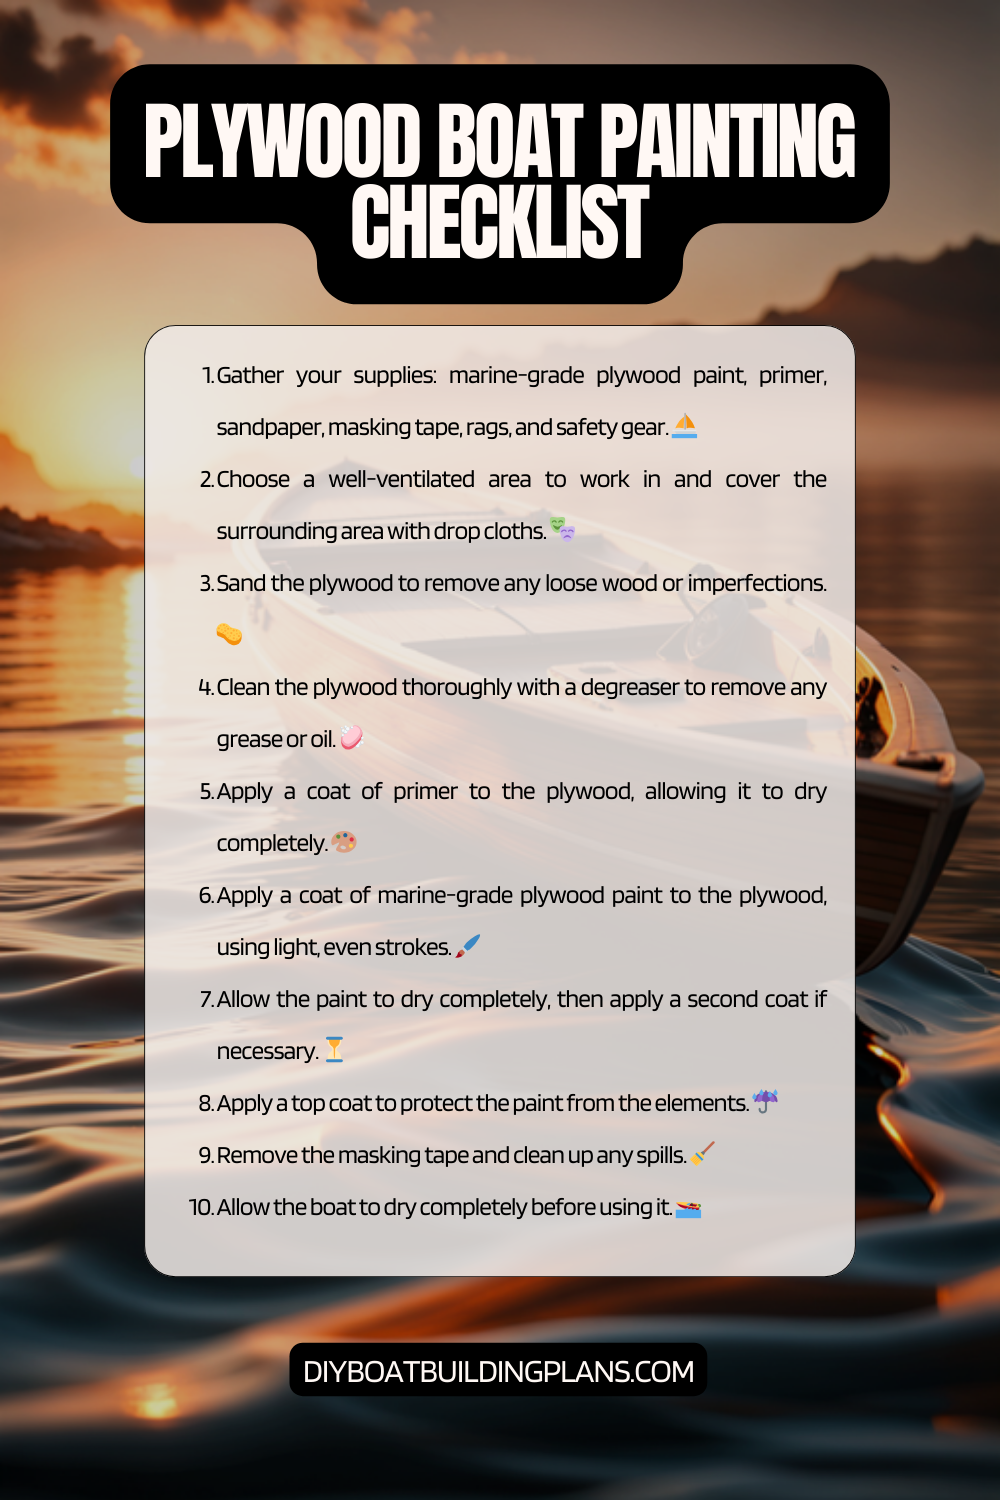
Plywood Boat Painting Checklist
Conclusion – Plywood Boat Painting Tips
Painting your plywood boat is a crucial step in maintaining its appearance and protecting it from the elements. By choosing the right paint, properly preparing the surface, and employing proper techniques, you can achieve a professional-looking finish that will enhance the longevity and aesthetic appeal of your boat. Remember to avoid common mistakes, maintain your boat’s paint job regularly, and follow the manufacturer’s instructions for optimal results. With proper care and attention, your plywood boat will continue to turn heads on the water for years to come.
FAQs – Plywood Boat Painting Tips
What is plywood boat painting?
Plywood boat painting is the process of applying paint or other coatings to the surface of a plywood boat to protect it from water damage, UV rays, and other environmental factors.
Why is it important to paint a plywood boat?
Painting a plywood boat is important because it helps to protect the wood from water damage, rot, and other environmental factors. It also helps to improve the appearance of the boat and make it more attractive.
What are some tips for painting a plywood boat?
Some tips for painting a plywood boat include preparing the surface properly, using high-quality marine-grade paint, applying multiple coats of paint, and allowing each coat to dry completely before applying the next one.
What type of paint should I use for a plywood boat?
It is recommended to use marine-grade paint for plywood boats. This type of paint is specifically designed to withstand the harsh marine environment and provide long-lasting protection to the wood.
How do I prepare the surface of a plywood boat for painting?
To prepare the surface of a plywood boat for painting, you should first clean it thoroughly with soap and water. Then, sand the surface to remove any rough spots or imperfections. Finally, apply a coat of primer to help the paint adhere better to the wood.
How many coats of paint should I apply to a plywood boat?
It is recommended to apply at least two coats of paint to a plywood boat. However, depending on the type of paint and the condition of the wood, you may need to apply more coats to achieve the desired level of protection and appearance.
How long does it take for paint to dry on a plywood boat?
The drying time for paint on a plywood boat can vary depending on the type of paint, the temperature, and the humidity. Generally, it can take anywhere from a few hours to a few days for paint to dry completely. It is important to allow each coat of paint to dry completely before applying the next one.