Overview of Jon Boat Painting Tips
Painting a jon boat is an essential step in maintaining its appearance and protecting it from the elements. Whether you use your jon boat for fishing, hunting, or recreational purposes, a fresh coat of paint can make a significant difference in its overall aesthetics and longevity. Not only does painting your jon boat enhance its visual appeal, but it also acts as a protective barrier against rust, corrosion, and UV damage. In this article, we will explore the benefits of painting a jon boat and provide you with valuable tips and techniques to achieve a professional-looking finish.
Key Takeaways
- Choose the right paint for your jon boat based on its material and intended use.
- Properly prepare your jon boat by cleaning, sanding, and applying primer before painting.
- Use the right brush or roller for your jon boat to ensure a smooth and even finish.
- Apply multiple coats of paint for durability and to avoid common painting mistakes.
- Maintain your jon boat’s paint job by regularly cleaning and touching up any chips or scratches.

Choosing the Right Paint for Your Jon Boat
When it comes to choosing the right paint for your jon boat, there are several factors to consider. The type of paint you select will depend on the material of your boat, the intended use, and your personal preferences. There are various types of paint available for jon boats, including marine-grade enamel, epoxy-based paints, and aluminum-specific coatings. Marine-grade enamel is a popular choice due to its durability and resistance to water and UV rays. Epoxy-based paints offer excellent adhesion and protection against corrosion. Aluminum-specific coatings are designed specifically for aluminum boats and provide superior protection against oxidation.
Preparing Your Jon Boat for Painting
Before you begin painting your jon boat, it is crucial to prepare the surface properly. This preparation process involves cleaning the boat, removing any old paint or coatings, and filling in any cracks or holes. Start by thoroughly cleaning the boat using a mild detergent and water solution. This will remove any dirt, grime, or grease that may interfere with the adhesion of the paint. Next, remove any existing paint or coatings using a chemical stripper or sanding technique, depending on the type of paint used previously. Once the surface is clean and free of old paint, inspect it for any cracks or holes that need to be filled in using an appropriate filler or epoxy.
Sanding Techniques for a Smooth Finish
| Technique | Description | Advantages | Disadvantages |
| Hand Sanding | Sanding by hand using sandpaper or sanding blocks. | Controlled, can reach tight spaces, inexpensive. | Time-consuming, can cause uneven sanding. |
| Power Sanding | Sanding using a power tool such as an orbital sander or belt sander. | Efficient, saves time, can cover large areas. | Expensive, can cause damage if not used properly. |
| Wet Sanding | Sanding using water to lubricate the surface and prevent dust. | Produces a smooth finish, reduces dust, can be used on delicate surfaces. | Time-consuming, requires special equipment, can cause water damage if not done properly. |
| Buffing | Using a buffing wheel or pad to polish the surface. | Produces a high-gloss finish, can remove scratches and imperfections. | Requires special equipment, can be difficult to control, can cause damage if not done properly. |
Sanding is a crucial step in achieving a smooth and even finish on your jon boat. It helps to remove any imperfections, rough spots, or uneven surfaces, ensuring that the paint adheres properly. Start by using coarse-grit sandpaper to remove any rough areas or old paint remnants. Gradually progress to finer-grit sandpaper to smoothen the surface further. Pay close attention to corners, edges, and hard-to-reach areas. Sanding in multiple directions will help create a uniform surface. After sanding, make sure to remove any dust or debris using a tack cloth or compressed air.
Applying Primer to Your Jon Boat
Applying a primer is an essential step in the painting process as it helps improve adhesion and provides a smooth base for the topcoat. Primers also offer additional protection against rust and corrosion. There are different types of primers available, such as self-etching primers, epoxy primers, and zinc chromate primers. Self-etching primers are ideal for aluminum boats as they chemically bond with the metal surface, providing excellent adhesion. Epoxy primers offer superior corrosion resistance and adhesion. Zinc chromate primers are commonly used on steel boats as they provide excellent rust protection.
Tips for Painting Your Jon Boat
To achieve a professional-looking finish when painting your jon boat, it is essential to follow some best practices and techniques. Firstly, ensure that you are working in a well-ventilated area to avoid inhaling fumes from the paint. It is also crucial to apply thin coats of paint rather than thick layers to prevent drips and runs. Start by painting the hard-to-reach areas first before moving on to larger surfaces. Use long, even strokes with a brush or roller to ensure an even application of paint. Avoid going back over areas that have already started to dry, as this can cause streaks or unevenness.
Choosing the Right Brush or Roller for Your Jon Boat
Choosing the right brush or roller is essential for achieving a smooth and professional finish on your jon boat. For smaller areas or intricate details, a high-quality synthetic bristle brush is recommended. Synthetic brushes are durable, easy to clean, and provide excellent control. When painting larger surfaces, a foam or microfiber roller is a suitable choice. Foam rollers offer a smooth finish and are ideal for applying thin coats of paint. Microfiber rollers are excellent for achieving a textured finish and are suitable for rougher surfaces.
Applying Multiple Coats of Paint for Durability
Applying multiple coats of paint is crucial for ensuring the durability and longevity of your jon boat’s paint job. Each coat adds an additional layer of protection against the elements and enhances the overall appearance. When applying multiple coats, make sure to allow sufficient drying time between each layer. Follow the manufacturer’s instructions regarding drying times and recoat intervals. Applying thin coats will also help prevent drips and runs, ensuring a smooth and even finish.
Avoiding Common Painting Mistakes
To achieve a professional-looking finish on your jon boat, it is essential to avoid common painting mistakes. One common mistake is rushing the preparation process. Properly cleaning, sanding, and priming the surface will significantly impact the final result. Another mistake to avoid is applying too thick of a coat of paint. Thick layers can lead to drips, runs, and an uneven finish. Additionally, painting in unfavorable weather conditions, such as high humidity or extreme temperatures, can affect the drying time and adhesion of the paint.
Download over 500 Boat Plans. Click on the link below.
-->Click Here<--
Maintaining Your Jon Boat’s Paint Job
Once you have completed painting your jon boat, it is crucial to maintain its paint job to ensure its longevity. Regularly clean the boat using a mild detergent and water solution to remove dirt, salt, or other contaminants. Avoid using abrasive cleaners or harsh chemicals that can damage the paint. If your jon boat develops any scratches or chips, touch them up promptly using the same paint and techniques used during the initial painting process. This will prevent further damage and maintain the overall appearance of your boat.
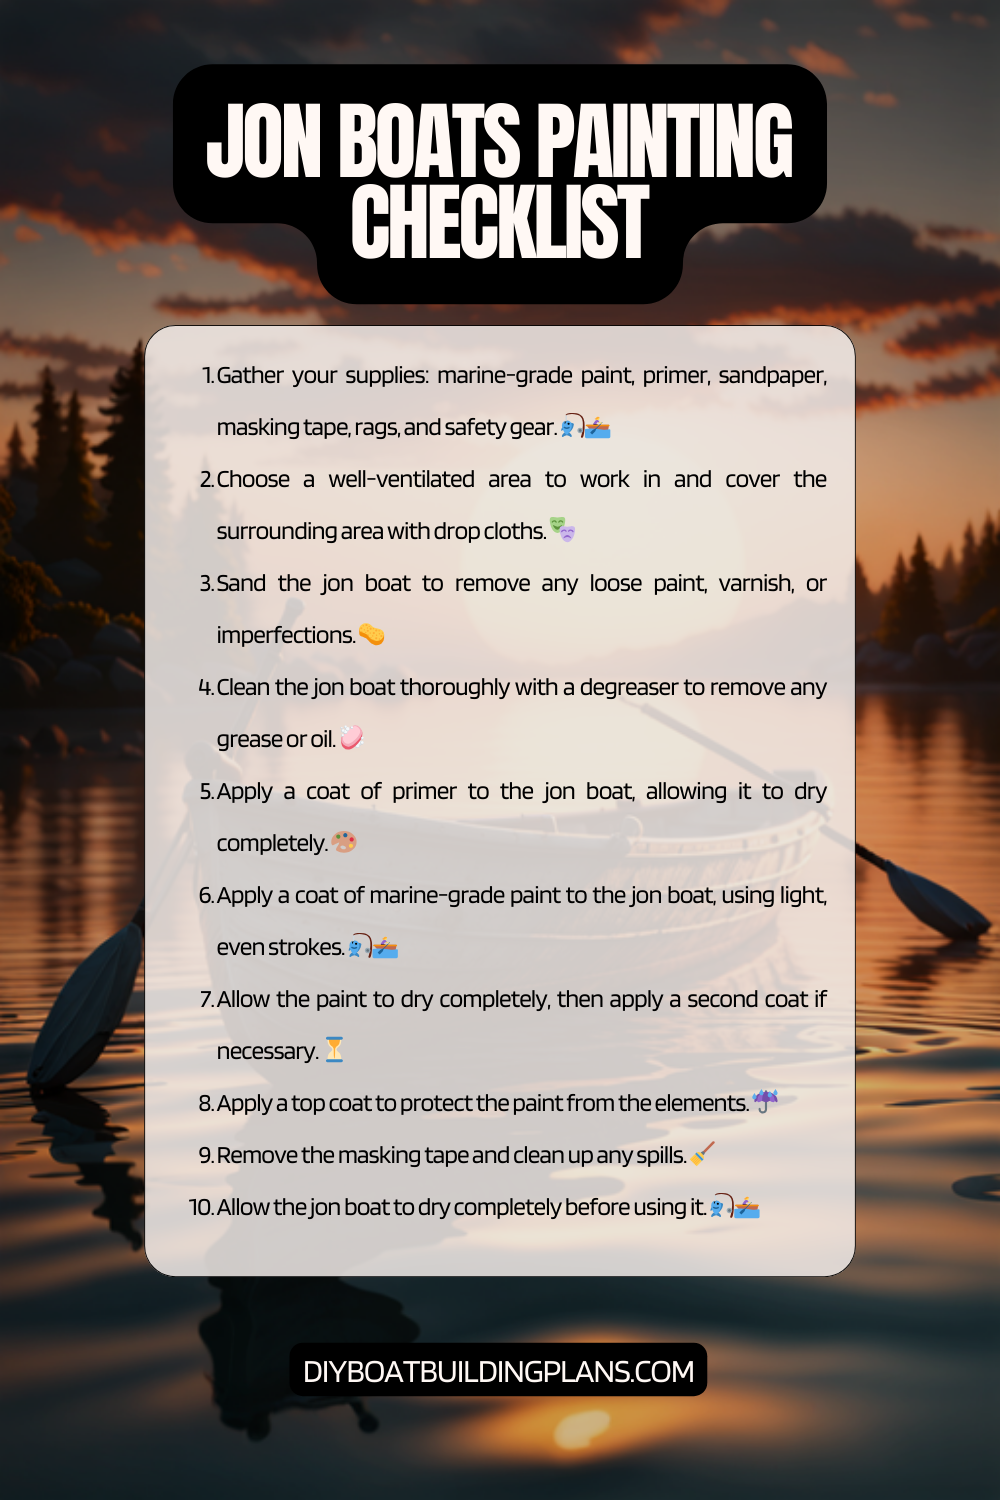
Jon Boat Painting Checklist
Conclusion – Jon Boat Painting Tips
In conclusion, painting your jon boat is a vital step in maintaining its appearance and protecting it from the elements. Choosing the right paint, properly preparing the surface, and following best practices during the painting process are essential for achieving a professional-looking finish. By investing time and effort into painting your jon boat, you can enhance its visual appeal, extend its lifespan, and enjoy many more adventures on the water. Remember to regularly maintain your boat’s paint job to ensure its longevity and keep it looking its best.
FAQs – Jon Boat Painting Tips
What is a Jon boat?
A Jon boat is a flat-bottomed boat that is typically used for fishing or hunting in shallow waters. It is made of aluminum or wood and is usually small in size.
Why should I paint my Jon boat?
Painting your Jon boat can help protect it from the elements, prevent rust and corrosion, and improve its appearance. It can also increase the resale value of your boat.
What type of paint should I use to paint my Jon boat?
You should use marine-grade paint that is specifically designed for use on boats. This type of paint is formulated to withstand exposure to water, sunlight, and other harsh environmental conditions.
How do I prepare my Jon boat for painting?
Before painting your Jon boat, you should clean it thoroughly to remove any dirt, grime, or debris. You should also sand the surface to create a smooth, even surface for the paint to adhere to. If there are any dents or scratches, you should fill them in with putty or epoxy.
What is the best way to apply paint to my Jon boat?
The best way to apply paint to your Jon boat is to use a high-quality brush or roller. You should apply the paint in thin, even coats, and allow each coat to dry completely before applying the next one. You may need to apply multiple coats to achieve the desired level of coverage.
How long does it take for the paint to dry?
The drying time for marine-grade paint can vary depending on the temperature and humidity levels. In general, you should allow each coat to dry for at least 24 hours before applying the next one. It may take several days for the paint to fully cure.