

Overview of Dinghy Painting Tips
Painting your dinghy is an important aspect of boat maintenance that often gets overlooked. Many boat owners focus on maintaining the engine and other mechanical components, but neglect the exterior appearance of their dinghy. However, painting your dinghy not only enhances its aesthetic appeal but also provides protection against the harsh elements of the marine environment.
There are several benefits to painting your dinghy. Firstly, a fresh coat of paint can give your dinghy a brand new look, making it stand out on the water. Whether you choose a bold color or a classic white, a well-painted dinghy can make a statement and reflect your personal style. Additionally, painting your dinghy can help protect it from the damaging effects of UV rays, saltwater, and other environmental factors. The paint acts as a barrier, preventing corrosion and extending the lifespan of your dinghy.
Key Takeaways
- Choose the right paint for your dinghy based on the material and usage.
- Proper preparation, including sanding and priming, is crucial for a successful paint job.
- Use different painting techniques for different materials, such as fiberglass and aluminum.
- Adding graphics and designs can enhance the appearance of your dinghy.
- Regular maintenance and care will extend the life of your painted dinghy.

Choosing the Right Paint for Your Dinghy
When it comes to choosing paint for your dinghy, there are several factors to consider. Firstly, you need to decide whether you want to use a one-part or two-part paint. One-part paints are easier to apply and generally more affordable, but they may not provide as durable or long-lasting finish as two-part paints. Two-part paints require mixing a base and an activator, which results in a harder and more resilient finish.
Another important consideration is the type of paint suitable for your dinghy material. Aluminum dinghies require specific aluminum-friendly paints that adhere well to the surface and provide protection against corrosion. Fiberglass dinghies can be painted with either one-part or two-part marine paints, while wooden dinghies may require specialized marine wood paints that offer flexibility and durability.
Some recommended paint brands for dinghy painting include Interlux, Pettit, and Awlgrip. These brands offer a wide range of marine paints specifically designed for different types of boats and dinghies. It is important to choose a reputable brand that provides high-quality paints to ensure the best results for your dinghy.
Preparing Your Dinghy for Painting
Before you can start painting your dinghy, proper preparation is crucial. This involves cleaning the dinghy thoroughly to remove any dirt, grime, or contaminants that may affect the adhesion of the paint. Use a mild detergent and water to scrub the surface, paying attention to hard-to-reach areas and corners.
If your dinghy already has old paint, it is essential to remove it before applying a new coat. This can be done using a paint stripper or by sanding the surface. Be sure to follow the manufacturer’s instructions when using a paint stripper and wear protective gear such as gloves and goggles.
After removing old paint, inspect the dinghy for any cracks or holes that need to be filled in. Use an appropriate marine-grade filler to repair these imperfections. Once the filler has dried, sand it down to create a smooth and even surface.
Sanding Techniques for Dinghy Painting
| Technique | Description | Advantages | Disadvantages |
| Hand Sanding | Sanding by hand using sandpaper | Low cost, good for small areas | Time-consuming, inconsistent results |
| Power Sanding | Sanding using a power tool such as an orbital sander | Efficient, consistent results | Expensive, can damage surface if not used properly |
| Wet Sanding | Sanding using water to lubricate the surface | Less dust, smoother finish | Requires more time and effort, can damage surface if not done properly |
| Dry Sanding | Sanding without any lubrication | Quick, easy to do | Produces a lot of dust, can damage surface if not done properly |
Sanding is a crucial step in the dinghy painting process as it helps create a smooth surface for the paint to adhere to. Start by using coarse-grit sandpaper to remove any rough patches or imperfections on the dinghy’s surface. Gradually move on to finer-grit sandpaper to achieve a smoother finish.
When sanding, it is important to use even pressure and make long, smooth strokes. Avoid applying too much pressure as it can damage the underlying material. Sand in one direction rather than in circular motions to prevent swirl marks.
Different grits of sandpaper are suitable for different stages of sanding. Coarse-grit sandpaper, such as 80 or 120 grit, is ideal for initial sanding and removing old paint or rough surfaces. Medium-grit sandpaper, around 180 or 220 grit, can be used for further smoothing and preparing the surface for primer. Finally, fine-grit sandpaper, such as 320 or 400 grit, is used for the final sanding before painting.
Applying Primer to Your Dinghy
Priming your dinghy is a crucial step that should not be skipped. Primer acts as a bonding agent between the surface and the paint, ensuring better adhesion and a longer-lasting finish. It also helps seal the surface, preventing moisture from penetrating and causing damage.
There are different types of primers available, such as epoxy primers, etching primers, and self-etching primers. Epoxy primers are highly durable and provide excellent adhesion, making them suitable for aluminum and fiberglass dinghies. Etching primers are designed to promote adhesion on bare metal surfaces, while self-etching primers contain acid that chemically etches the surface for better adhesion.
To apply primer to your dinghy, start by thoroughly cleaning the surface to remove any dust or debris. Follow the manufacturer’s instructions for mixing and applying the primer. Use a brush or roller to apply an even coat of primer, making sure to cover all areas of the dinghy. Allow the primer to dry completely before moving on to the next step.
Tips for Painting Your Dinghy
When it comes to painting your dinghy, there are several tips and techniques that can help you achieve a professional-looking finish. Firstly, choose a day with optimal weather conditions for painting. Avoid painting on extremely hot or humid days as it can affect the drying time and result in an uneven finish. Ideally, choose a day with mild temperatures and low humidity.
Properly mixing the paint is essential for achieving consistent color and texture. Follow the manufacturer’s instructions for mixing ratios and use a stir stick or paint mixer to ensure thorough mixing. It is also important to strain the paint before application to remove any impurities or lumps.
When applying paint to your dinghy, use smooth and even strokes. Start from one end and work your way towards the other, overlapping each stroke slightly to ensure even coverage. Avoid applying too much paint in one coat as it can lead to drips and uneven drying. It is better to apply multiple thin coats, allowing each coat to dry completely before applying the next.
Painting Techniques for Different Dinghy Materials
The painting techniques for different dinghy materials may vary slightly. When painting aluminum dinghies, it is important to use a paint specifically formulated for aluminum surfaces. Aluminum-friendly paints provide better adhesion and protection against corrosion. Follow the same steps of cleaning, sanding, priming, and painting as mentioned earlier.
For fiberglass dinghies, the process is similar to aluminum dinghies. However, fiberglass surfaces may require additional steps such as gelcoat repair or filling in any fiberglass cracks or chips before painting. Use a marine-grade fiberglass filler and follow the manufacturer’s instructions for proper application.
Wooden dinghies require special attention when it comes to painting. It is important to choose a marine-grade wood paint that offers flexibility and durability to withstand the constant exposure to water. Before painting, ensure that the wood is properly sealed and any cracks or imperfections are filled in with an appropriate wood filler. Sand the surface smooth and apply a suitable primer before painting.
Adding Graphics and Designs to Your Dinghy
If you want to take your dinghy’s appearance to the next level, adding graphics and designs can be a great option. There are several ways to add graphics and designs to your dinghy, depending on your preferences and skill level.
One popular method is using vinyl decals or stickers. These can be easily applied to the dinghy’s surface and come in a wide variety of designs and colors. Ensure that the surface is clean and dry before applying the decals, and use a squeegee or credit card to remove any air bubbles.
For those with artistic skills, hand-painting designs on the dinghy can create a unique and personalized look. Use marine-grade paints and brushes suitable for the dinghy material. Sketch out your design beforehand and take your time to ensure precise and clean lines.
Another option is using stencils to create patterns or shapes on your dinghy. Stencils can be purchased or made at home using cardboard or plastic sheets. Secure the stencil in place and use a brush or spray paint to apply the design. Remove the stencil carefully to reveal the finished pattern.
Caring for Your Painted Dinghy
Once you have painted your dinghy, proper care and maintenance are essential to keep it looking its best. Regular cleaning is important to remove salt, dirt, and other contaminants that can damage the paint over time. Use a mild detergent and water to scrub the surface, avoiding abrasive cleaners that can scratch the paint.
It is also recommended to apply a protective wax or polish to your painted dinghy. This helps create a barrier against UV rays and provides additional protection against fading or chipping. Follow the manufacturer’s instructions for proper application of the wax or polish.
Inspect your painted dinghy regularly for any signs of damage or wear. Touch up any chips or scratches with matching paint to prevent further damage. It is also important to store your dinghy properly when not in use, protecting it from harsh weather conditions and UV exposure.
Download over 500 Boat Plans. Click on the link below.
-->Click Here<--
Common Mistakes to Avoid When Painting Your Dinghy
While painting your dinghy can be a rewarding project, there are some common mistakes that you should avoid. One common mistake is rushing through the preparation process. Properly cleaning, sanding, and priming your dinghy are crucial steps that should not be skipped or rushed. Taking the time to prepare the surface properly will ensure better adhesion and a longer-lasting finish.
Another mistake is applying too thick of a coat of paint. Thick coats can lead to drips, uneven drying, and a less durable finish. It is better to apply multiple thin coats, allowing each coat to dry completely before applying the next.
Using the wrong type of paint or primer for your dinghy material is another common mistake. Different materials require specific paints and primers that adhere well and provide adequate protection. Be sure to choose the appropriate products for your dinghy to achieve the best results.
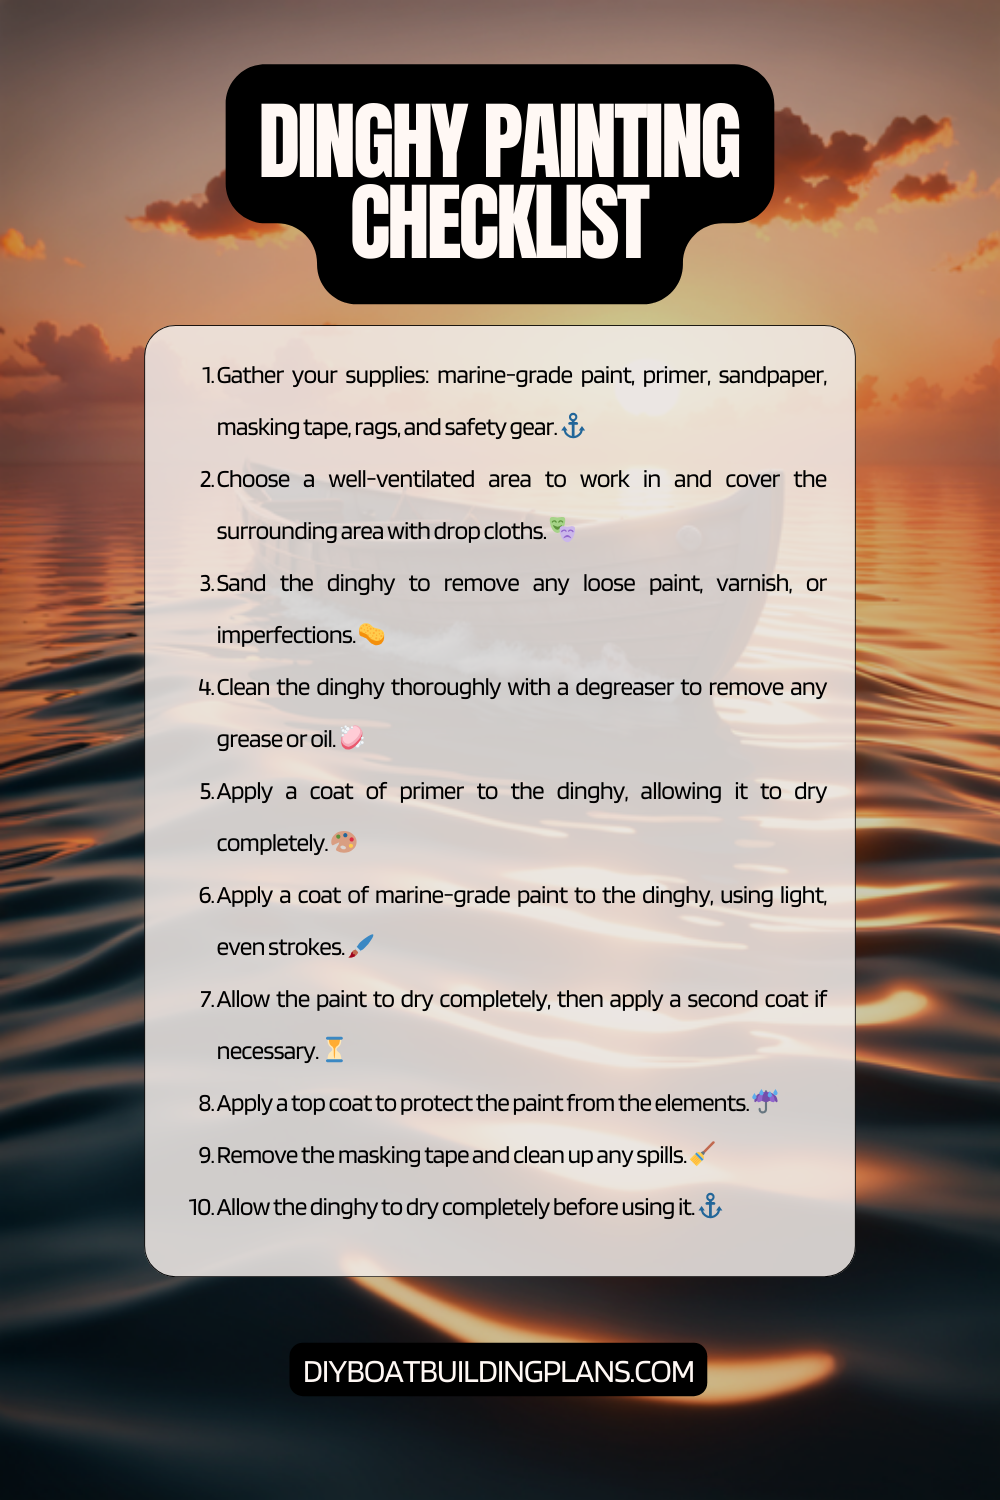
Dinghy Painting Checklist
Conclusion – Dinghy Painting Tips
In conclusion, painting your dinghy is an important aspect of boat maintenance that should not be overlooked. It not only enhances the appearance of your dinghy but also provides protection against the harsh marine environment. Choosing the right paint, properly preparing the surface, and using proper painting techniques are key to achieving a professional-looking finish.
Whether you have an aluminum, fiberglass, or wooden dinghy, there are paints and techniques available to suit your specific needs. Adding graphics and designs can further personalize your dinghy and make it stand out on the water.
With proper care and maintenance, your painted dinghy can maintain its appearance and protection for years to come. Regular cleaning, waxing, and touch-ups will help keep your dinghy looking its best.
So don’t neglect your dinghy’s exterior any longer – take the time to paint it and enjoy the benefits of a fresh and protected finish. With the right materials, techniques, and a little bit of patience, you can transform your dinghy into a true work of art on the water.
FAQs – Dinghy Painting Tips
What is dinghy painting?
Dinghy painting is the process of applying paint to a small boat, typically made of fiberglass or wood, to protect it from the elements and improve its appearance.
Why should I paint my dinghy?
Painting your dinghy can help protect it from UV rays, saltwater, and other environmental factors that can cause damage over time. It can also improve the appearance of your dinghy and make it easier to spot in the water.
What kind of paint should I use?
The type of paint you should use depends on the material your dinghy is made of. For fiberglass dinghies, marine-grade polyurethane or epoxy paints are recommended. For wooden dinghies, marine-grade enamel or varnish is typically used.
How do I prepare my dinghy for painting?
Before painting your dinghy, you should clean it thoroughly and sand any rough or uneven areas. You may also need to apply a primer to ensure the paint adheres properly.
Can I paint my dinghy myself?
Yes, you can paint your dinghy yourself if you have the necessary tools and experience. However, if you are unsure about the process or don’t have the right equipment, it may be best to hire a professional.
How long does dinghy paint last?
The lifespan of dinghy paint depends on a variety of factors, including the quality of the paint, the conditions it is exposed to, and how well it is maintained. Generally, you can expect dinghy paint to last anywhere from 2-5 years.